在 minikube 上部署 flink And your doubts are more about the proper running job and the guarantees you have that the job will run as expected regarding the application requirements, as well other non-controlled issues like network, transient exceptions in the worker/master process, I can continue the list, but you already know how the applications behave in distributed systems and what you can do to minimize the errors.
To help you to minimize the risk and to help you understand better how the scale-up/down of workers work, how exactly you can do a savepoint and start the job from the previously savepoint saved without losing information is important to build a safe environment where you can test easily this kind of doubts as well to validate other kinds of stuff specific to the framework and/or application requirements.
It is notorious to answer all of your questions you may need to put your hands on your company conversation application and open a conversation channel with your manager and/or with the SRE/Infrastructure/SEC teams to help you to set up a cluster environment to validate your ideas. Of course, you may have X environments already configured perhaps staging/quality/production, but your access to those machines in each environment may be reduced: can’t shutdown machines, restart machines, change configurations, for instance, to validate the environment under heavy loading or simulate core services down your hands are tight and you need to cross fingers and pray because you need that your system works properly for all the time … I’m not doubting in your capacities but you already know those kinds of difficulties came to you in many forms.
you: Hi, I need to change some configurations in Flink cluster, you have time to help me?
infra team: we don’t have time today and tomorrow we will proceed with resilience tests, maybe in two days we can schedule some time to discuss what you really want to do
infra team: Hi, regarding the talk we had three days ago, can you explain better what you want?
you: Hi! I need to change some configurations in the flink cluster (staging environment) to test bad behaving from S3 external dependency and validate if the job recoveries it self without losing information
infra team: I see. Maybe next week we can tackle that
Kubernetes
Kubernetes (k8s) was created by Google and now is vastly used to be one of the most popular open-source orchestrator systems for managing containerized applications across multiple hosts providing the mechanisms necessaries to build and deploy scalable and reliable applications for distributed systems. We are living an era where the uptime of services must be near 99.9% and to achieve that is necessary to have mechanisms that even in the presence of system crashes they cannot fail. Those kinds of systems must have some characteristics that must scale in case of some unexpected workload or even in simple maintenance or deployment the downtime must be in the order of zero.
Flink deployments on Kubernetes
Apache Flink could be deployed on Kubernetes using two modes, session cluster or job cluster. Session cluster is a running standalone cluster that can run multiple jobs, translating to Kubernetes world the session cluster is composed of three components:
- Deployment object which specifies the JobManager
- Deployment object which specifies the TaskManagers
- and a Service object exposing the JobManager’s REST API
The job cluster deploys a dedicated cluster for each job.
In the next section, we will talk about some basic concepts on Kubernetes.
Pod
Pods are the smallest deployable units of computing that can be created and managed in Kubernetes.
Pods are a collection of containers that might contain one or more applications that are sharing the namespace, volumes and the network stack. The containers are strongly coupled, as they are sharing the network stack they can communicate with each other using localhost.
Containers deployed in other Pods can’t communicate using the localhost because they have distinct IP addresses and should interact using the Pod IP address.
You can find more details about the pod at the Kubernetes website.
ReplicaSets
A ReplicaSet’s purpose is to maintain a stable set of replica Pods running at any given time. As such, it is often used to guarantee the availability of a specified number of identical Pods.
ReplicaSet makes the life easier managing and ensuring a pre-defined number of replicated pods running, without the necessity of creating manual copies of a Pod, avoiding time and errors. Pods managed by ReplicaSets can fail and a new instance will be automatically rescheduled.
You can find more details about the replicaSets on the Kubernetes website.
Service
An abstract way to expose an application running on a set of Pods as a network service.
Pods are considered ephemeral as the Kubernetes is a dynamic system that can schedule new pods or downscale pods or even disable them. Each pod has an IP address which is changed all the time the pod dies (if managed by a controller) which means all the service that interacts with this Pod must update the IP otherwise the request to that service will fail.
To solve this kind of problem is necessary to have a service discovery, to solve the issue of finding processes that are listening at a given address for which the service works properly.
Kubernetes solves this issue using the Service object, which defines a label selector and the pods belonging to the service have that label. This means that an IP address assigned to a service does not change over time.
You can find more details about the service on the Kubernetes website.
Deployments
A Deployment provides declarative updates for Pods and ReplicaSets.
Using the Deployment object you can manage the release process within an efficient manner without downtime or errors. The deployment is controlled by a service named deployment controller that is running on the Kubernetes cluster.
You can find more details about the deployments on the Kubernetes website.
Creating Flink Cluster on Kubernetes
It’s time to setup the Kubernetes Cluster. First is necessary to install Minikube which will run a single-node Kubernetes cluster inside a Virtual Machine.
Besides Minikube you need the command-line tool Kubectl, which allows you to run commands against Kubernetes clusters. However, if you have issues in Minikube accessing the Internet could be necessary to use an HTTP/HTTPS proxy with Minikube.
Start the cluster as shown in Example 1.

Example 1. Kubernetes Cluster started using Minikube
The command, minikube start, starts by downloading the boot image and starting the Virtualbox VM. Note: is necessary to specify which VM driver will be used by Minikube in our example is used VirtualBox if you want to use another driver you can do doing the following command:
minikube start — vm-driver=<driver_name>
Minikube was started using the Kubernetes version v1.17.3, but you are free to configure other than that version:
minikube start — kubernetes-version <kubernetes_version>.
Running our Flink Session Cluster
Using a session cluster is necessary to use different Kubernetes resources, as highlighted above is necessary:
- Deployment object which specifies the JobManager
- Deployment object which specifies the TaskManagers
- and a Service object exposing the JobManager’s REST API
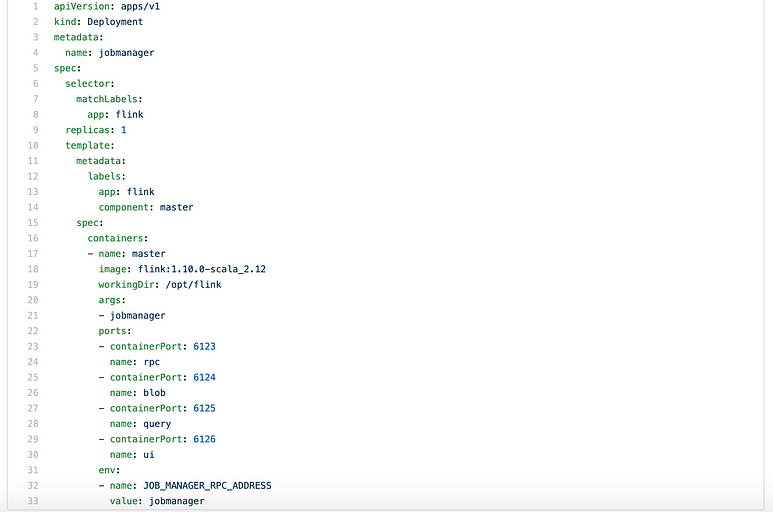
Let’s start with 1) and create a deployment object to instantiate our JobManager.

Deployment object for a JobManager
This deployment object creates a single JobManager with the container image Flink-1.10.0 for scala and exposes the container ports for RPC communication, blob server, for the queryable state server and web UI.
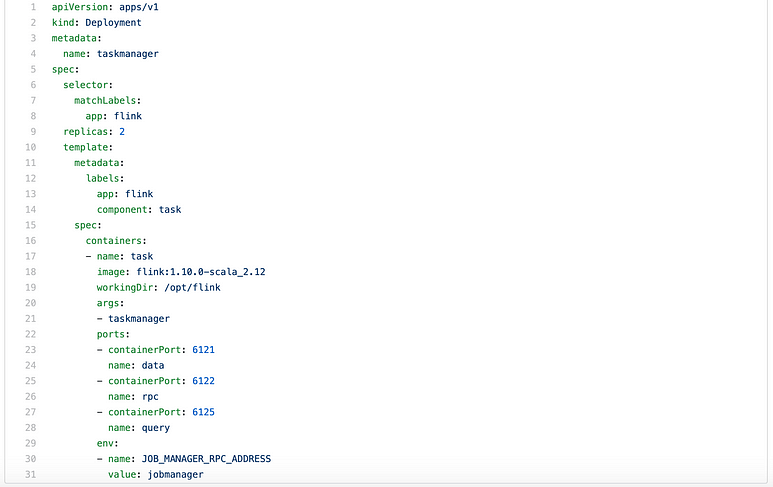
Moving to 2) will be created the deployment object to instantiate the TaskManagers.

Deployment object for TaskManager
The TaskManager deployment specifies two instances that will be available to run the jobs scheduled by the JobManager. Docker container image is the same as the JobManager and the command to start the workers are different from the start of a JobManager.
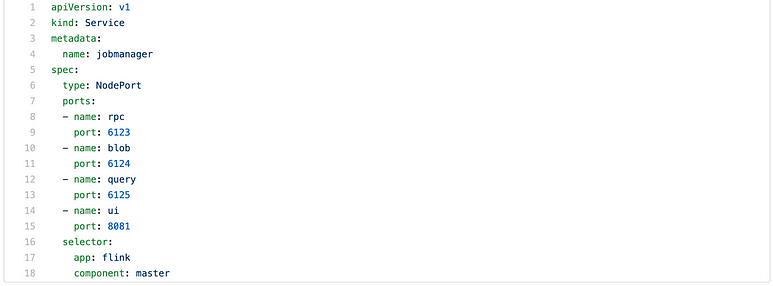
Finally, 3) is created the service object which is a piece very important in our cluster because it exposes the JobManager to the TaskManagers, otherwise, the workers can’t connect to the master process

Service object for JobManager
As you may notice the type of service was defined as NodePort this was added due to the fact we want to interact with the JobManager outside the Kubernetes Cluster.
It’s time to start our Flink Cluster, to do that we will add the definitions built above to the Kubernetes, executing the following commands:
kubectl create -f jobmanager.yaml
kubectl create -f jobmanager-service.yaml
kubectl create -f taskmanger.yaml
To see the status of the deployments:
kubectl get deployments
 ![[image-20240725155903157.png]]
ow we have our Kubernetes Cluster running a Flink Cluster with one JobManager and two TaskManagers within two slots to run jobs.
It is important to remember that a TaskManager can be configured with a certain number of processing slots which give the ability to execute several tasks at the same time. Those tasks can be subtasks of the same application or from different applications. Looking better we can distinguish three types of parallelism:
- Job parallelism
- Task parallelism
- Data parallelism
Hum ok, Job Parallelism is easy but Data Parallelism and Task Parallelism? Excuse me …
Data parallelism is the ability to partition your data and have the multiples operators executing those subsets of data if you already worked with Apache Kafka the concept is similar to each partition of a topic. Task parallelism, becomes easier, tasks from different operators belonging to the same application.
Build Flink Job
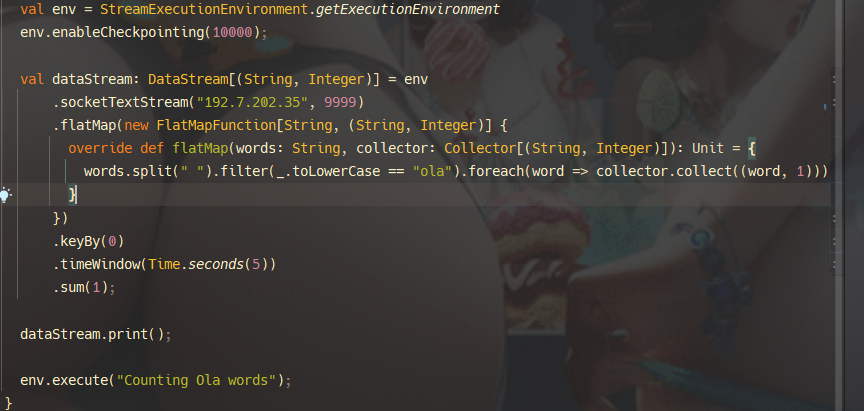
Our application will be a similar example built on the Apache Flink documentation, which counts the number occurrences of the word Ola, which is a Portuguese word meaning the same as hello, coming from a Web Socket using micro-batching processing of 5 seconds. The example was build using scala 2.12 and maven for dependency management and project management.
 ![[image-20240725155953199.png]]
To run the application, you need to run the command line netcat to open a TCP connection which will be used to listen and send data:
nc -lk 9999
Go to the project on Github and clone the project, after you did that run the command at the root of the project:
mvn clean package
and will be generated a jar within our application code in target/streaming-job-ola-word-1.0-SNAPSHOT.jar.
Running our first Flink Job
Running our application implies access to Web UI of Flink, isn’t mandatory for instance you can do the deploy and start the job application by the Rest API of Flink or by the Flink utilities.
To know the endpoint of Web UI of Flink, Minikube provides a command to retrieve the URL of service:
minikube service jobmanager –url
 在 49556 上可以看见
 ![[image-20240725160106029.png]]
The Flink Cluster has two instances of TaskManagers, previously created with non-Flink job running. To put a job running you can submit the previously job created, to do that you can click in the option Submit New Job and upload the job to the Flink using the button Add New, next click on the job uploaded and click on the button Submit. To interact with the job, if you remember you can use the command tool netcat:
nc -lk 9999
And you can start sending words to our job.
 ![[image-20240725160238335.png]]
You can take a look at the response of this interaction seeing the logs of the Taskmanager.访问 taskmanager 的 pod 日志
