安装 kubegems
1
2
3
|
kubectl create namespace kubegems-installer
export KUBEGEMS_VERSION=v1.24.5
kubectl apply -f https://github.com/kubegems/kubegems/raw/${KUBEGEMS_VERSION}/deploy/installer.yaml
|
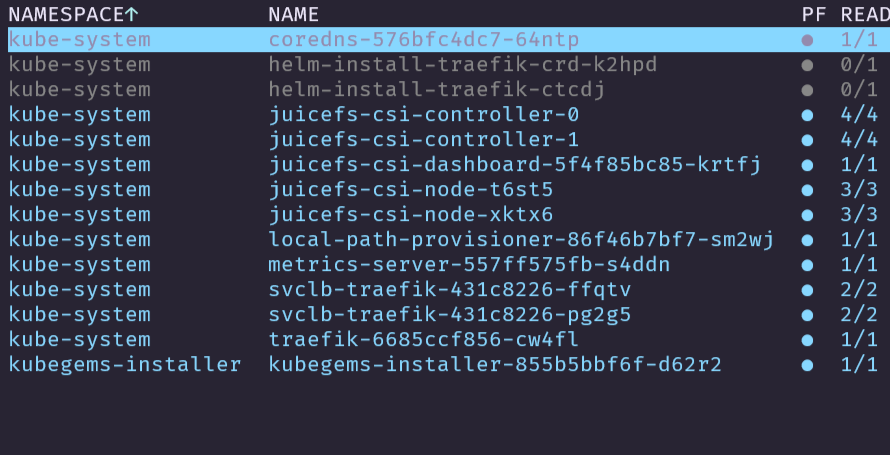
查看 kubegems 是否安装成功
 ![[image-20240702160800749.png]]
接下来部署 kubegems
1
2
3
4
5
6
7
8
9
|
 kubectl create namespace kubegems

 export STORAGE_CLASS=juicefs-sc
 export IMAGE_REGISTY=registry.cn-beijing.aliyuncs.com
curl -sL https://github.com/kubegems/kubegems/raw/${KUBEGEMS_VERSION}/deploy/kubegems.yaml \
| sed -e "s/local-path/${STORAGE_CLASS}/g" -e "s/docker.io/${IMAGE_REGISTY}/g" \
> kubegems.yaml

 kubectl apply -f kubegems.yaml
|
kubegems cr 下发后,大约五分钟后才会一切正常。
换一个版本,这个 v1.24.5 好像有问题。
1
|
export KUBEGEMS_VERSION=v1.24.4
|
k3s 重新再安装
安装主节点
1
2
3
4
5
6
|
curl –sfL \
 https://rancher-mirror.oss-cn-beijing.aliyuncs.com/k3s/k3s-install.sh | \ INSTALL_K3S_MIRROR=cn sh -s - \
  --system-default-registry "registry.cn-hangzhou.aliyuncs.com" \
  --write-kubeconfig ~/.kube/config \
  --write-kubeconfig-mode 666 \
  --disable traefik
|
1
2
|
sudo -u root cat /var/lib/rancher/k3s/server/node-token
K103d95c39227b3a811b1fdbd897575211b7fda1b6ca7a3144dfd14490a0d032b03::server:235b7f7e36c61db83fcba53e7c287c27
|
加入到节点中
1
2
3
4
5
|
curl –sfL \ https://rancher-mirror.oss-cn-beijing.aliyuncs.com/k3s/k3s-install.sh | \ INSTALL_K3S_MIRROR=cn sh -s - \


curl -sfL https://rancher-mirror.oss-cn-beijing.aliyuncs.com/k3s/k3s-install.sh  | K3S_URL=https://10.7.10.17:6443 INSTALL_K3S_MIRROR=cn K3S_TOKEN=K103d95c39227b3a811b1fdbd897575211b7fda1b6ca7a3144dfd14490a0d032b03::server:235b7f7e36c61db83fcba53e7c287c27 sh -s -
|
首先,从https://get.k3s.io 使用安装脚本在 systemd 和基于 openrc 的系统上将 K3s 作为一个服务进行安装。但是我们需要添加一些额外的环境变量来配置安装。首先--no-deploy,这一命令可以关掉现有的 ingress controller,因为我们想要部署 Kong 以利用一些插件。其次--write-kubeconfig-mode,它允许写入 kubeconfig 文件。这对于允许将 K3s 集群导入 Rancher 很有用。
1
|
$ curl -sfL https://get.k3s.io | sh -s - --no-deploy traefik --write-kubeconfig-mode 644 [INFO] Finding release for channel stable [INFO] Using v1.18.4+k3s1 as release [INFO] Downloading hash https://github.com/rancher/k3s/releases/download/v1.18.4+k3s1/sha256sum-amd64.txt [INFO] Downloading binary https://github.com/rancher/k3s/releases/download/v1.18.4+k3s1/k3s [INFO] Verifying binary download [INFO] Installing k3s to /usr/local/bin/k3s [INFO] Skipping /usr/local/bin/kubectl symlink to k3s, already exists [INFO] Creating /usr/local/bin/crictl symlink to k3s [INFO] Skipping /usr/local/bin/ctr symlink to k3s, command exists in PATH at /usr/bin/ctr [INFO] Creating killall script /usr/local/bin/k3s-killall.sh [INFO] Creating uninstall script /usr/local/bin/k3s-uninstall.sh [INFO] env: Creating environment file /etc/systemd/system/k3s.service.env [INFO] systemd: Creating service file /etc/systemd/system/k3s.service [INFO] systemd: Enabling k3s unit Created symlink from /etc/systemd/system/multi-user.target.wants/k3s.service to /etc/systemd/system/k3s.service. [INFO] systemd: Starting k3s
|
为 containerd 添加 mirror
 1
 2
 3
 4
 5
 6
 7
 8
 9
10
|
cat > /etc/rancher/k3s/registries.yaml <<EOF
mirrors:
  docker.io:
    endpoint:
      - "http://hub-mirror.c.163.com"
      - "https://docker.mirrors.ustc.edu.cn"
      - "https://registry.docker-cn.com"
EOF

systemctl restart k3s-agent
|
查看一下集群运行状态
 1
 2
 3
 4
 5
 6
 7
 8
 9
10
11
12
13
14
15
16
17
18
19
20
21
22
23
24
25
|
root@ubuntu-m1:~# kubectl get nodes -o wide
NAME        STATUS   ROLES                  AGE     VERSION        INTERNAL-IP   EXTERNAL-IP   OS-IMAGE           KERNEL-VERSION     CONTAINER-RUNTIME
ubuntu-2    Ready    <none>                 2m13s   v1.29.6+k3s1   10.7.10.173   <none>        Ubuntu 24.04 LTS   6.8.0-36-generic   containerd://1.7.17-k3s1
ubuntu-m1   Ready    control-plane,master   21m     v1.29.6+k3s1   10.7.10.17    <none>        Ubuntu 24.04 LTS   6.8.0-36-generic   containerd://1.7.17-k3s1
root@ubuntu-m1:~# kubectl get all -A
NAMESPACE     NAME                                          READY   STATUS    RESTARTS   AGE
kube-system   pod/coredns-58c9946f4-8v22g                   1/1     Running   0          21m
kube-system   pod/local-path-provisioner-6d79b7444c-rshfk   1/1     Running   0          21m
kube-system   pod/metrics-server-5bbb74b77-krv6l            1/1     Running   0          21m

NAMESPACE     NAME                     TYPE        CLUSTER-IP     EXTERNAL-IP   PORT(S)                  AGE
default       service/kubernetes       ClusterIP   10.43.0.1      <none>        443/TCP                  21m
kube-system   service/kube-dns         ClusterIP   10.43.0.10     <none>        53/UDP,53/TCP,9153/TCP   21m
kube-system   service/metrics-server   ClusterIP   10.43.44.122   <none>        443/TCP                  21m

NAMESPACE     NAME                                     READY   UP-TO-DATE   AVAILABLE   AGE
kube-system   deployment.apps/coredns                  1/1     1            1           21m
kube-system   deployment.apps/local-path-provisioner   1/1     1            1           21m
kube-system   deployment.apps/metrics-server           1/1     1            1           21m

NAMESPACE     NAME                                                DESIRED   CURRENT   READY   AGE
kube-system   replicaset.apps/coredns-58c9946f4                   1         1         1       21m
kube-system   replicaset.apps/local-path-provisioner-6d79b7444c   1         1         1       21m
kube-system   replicaset.apps/metrics-server-5bbb74b77            1         1         1       21m
root@ubuntu-m1:~#
|
在 K3s 上安装 Kong for Kubernetes
K3s 启动并运行后,你可以按照正常的步骤安装 Kong for Kubernetes,比如如下所示的 manifest:
 1
 2
 3
 4
 5
 6
 7
 8
 9
10
11
12
13
14
15
16
17
18
19
20
21
22
23
24
25
26
27
28
29
30
31
32
33
34
35
36
37
38
|
   helm repo add kong https://charts.konghq.com
    helm repo update
    helm install kong/kong --generate-name --set ingressController.installCRDs=false

WARNING: Kubernetes configuration file is group-readable. This is insecure. Location: /home/xfhuang/.kube/config
WARNING: Kubernetes configuration file is world-readable. This is insecure. Location: /home/xfhuang/.kube/config
"kong" has been added to your repositories
WARNING: Kubernetes configuration file is group-readable. This is insecure. Location: /home/xfhuang/.kube/config
WARNING: Kubernetes configuration file is world-readable. This is insecure. Location: /home/xfhuang/.kube/config
Hang tight while we grab the latest from your chart repositories...
...Successfully got an update from the "kong" chart repository
...Successfully got an update from the "ingress-nginx" chart repository
...Successfully got an update from the "jetstack" chart repository
...Successfully got an update from the "drone" chart repository
...Successfully got an update from the "rancher-alpha" chart repository
...Successfully got an update from the "kubernetes-dashboard" chart repository
...Successfully got an update from the "juicefs" chart repository
...Successfully got an update from the "rancher-latest" chart repository
...Successfully got an update from the "traefik" chart repository
...Successfully got an update from the "flink-operator-repo" chart repository
...Successfully got an update from the "istio" chart repository
...Successfully got an update from the "emqx" chart repository
...Successfully got an update from the "prometheus-community" chart repository
...Successfully got an update from the "kubeblocks" chart repository
...Successfully got an update from the "gitlab" chart repository
To connect to Kong, please execute the following commands:

HOST=$(kubectl get svc --namespace default kong-1719996907-kong-proxy -o jsonpath='{.status.loadBalancer.ingress[0].ip}')
PORT=$(kubectl get svc --namespace default kong-1719996907-kong-proxy -o jsonpath='{.spec.ports[0].port}')
export PROXY_IP=${HOST}:${PORT}
curl $PROXY_IP

Once installed, please follow along the getting started guide to start using
Kong: https://docs.konghq.com/kubernetes-ingress-controller/latest/guides/getting-started/

WARNING: Kong Manager will not be functional because the Admin API is not
enabled. Setting both .admin.enabled and .admin.http.enabled and/or
.admin.tls.enabled to true to enable the Admin API over HTTP/TLS.
|
当 Kong proxy 和 ingress controller 安装到 K3s server 上后,你检查服务应该能看到 kong-proxy LoadBalancer 的外部 IP。
 1
 2
 3
 4
 5
 6
 7
 8
 9
10
11
12
13
14
15
|
kubectl get all
NAME                                        READY   STATUS    RESTARTS   AGE
pod/kong-1719996907-kong-5d79f7f5fd-lfcsl   2/2     Running   0          20m

NAME                                              TYPE           CLUSTER-IP      EXTERNAL-IP              PORT(S)                         AGE
service/kong-1719996907-kong-manager              NodePort       10.43.132.159   <none>                   8002:31289/TCP,8445:31918/TCP   20m
service/kong-1719996907-kong-proxy                LoadBalancer   10.43.3.94      10.7.10.17,10.7.10.173   80:31519/TCP,443:30416/TCP      20m
service/kong-1719996907-kong-validation-webhook   ClusterIP      10.43.111.47    <none>                   443/TCP                         20m
service/kubernetes                                ClusterIP      10.43.0.1       <none>                   443/TCP                         52m

NAME                                   READY   UP-TO-DATE   AVAILABLE   AGE
deployment.apps/kong-1719996907-kong   1/1     1            1           20m

NAME                                              DESIRED   CURRENT   READY   AGE
replicaset.apps/kong-1719996907-kong-5d79f7f5fd   1         1         1       20m
|
验证一下
1
2
3
4
5
6
7
8
|
HOST=$(kubectl get svc --namespace default kong-1719996907-kong-proxy -o jsonpath='{.status.loadBalancer.ingress[0].ip}')
PORT=$(kubectl get svc --namespace default kong-1719996907-kong-proxy -o jsonpath='{.spec.ports[0].port}')
export PROXY_IP=${HOST}:${PORT}
curl $PROXY_IP
{
  "message":"no Route matched with those values",
  "request_id":"508a934c3fceb840ff80a54e3734cb2d"
}%
|
设置你的 K3s 应用程序以测试 Kong Ingress Controller
现在,让我们在 K3s 中设置一个回显服务器(echo server)应用程序以演示如何使用 Kong Ingress Controller:
1
2
3
4
|
kubectl apply -f https://bit.ly/echo-service
输出
service/echo created
deployment.apps/echo created
|
接下来,创建一个 ingress 规则以代理之前创建的 echo-server:
 1
 2
 3
 4
 5
 6
 7
 8
 9
10
11
12
13
14
15
16
17
18
19
|
 echo "
apiVersion: networking.k8s.io/v1
kind: Ingress
metadata:
  name: demo
spec:
  rules:
  - http:
      paths:
      - path: /foo
        pathType: Prefix
        backend:
          service:
            name: echo
            port:
              number: 80
" | kubectl apply -f -

ingress.networking.k8s.io/demo created
|
在进行一下测试看看
 1
 2
 3
 4
 5
 6
 7
 8
 9
10
11
12
13
14
15
16
17
18
19
20
21
22
23
24
25
26
|
HOST=$(kubectl get svc --namespace default kong-1719996907-kong-proxy -o jsonpath='{.status.loadBalancer.ingress[0].ip}')
PORT=$(kubectl get svc --namespace default kong-1719996907-kong-proxy -o jsonpath='{.spec.ports[0].port}')
export PROXY_IP=${HOST}:${PORT}
curl $PROXY_IP
{
"message":"no Route matched with those values",
"request_id":"b562da2d35c81617f75f593890031246"
}%
…/tools/k3s/traefik
curl -i $PROXY_IP/foo
HTTP/1.1 404 Not Found
Content-Length: 103
Connection: keep-alive
Content-Type: application/json; charset=utf-8
Date: Wed, 03 Jul 2024 12:24:55 GMT
Keep-Alive: timeout=4
Proxy-Connection: keep-alive
Server: kong/3.6.1
X-Kong-Request-Id: d8429e11ae25792be711805a893d9d29
X-Kong-Response-Latency: 0
{
"message":"no Route matched with those values",
"request_id":"d8429e11ae25792be711805a893d9d29"
}%
|
上面出现的问题是,kon-ingress 还是失败了。
参考文档:
在 K3s 上使用 Kong 网关插件,开启 K3s 的无限可能!-腾讯云开发者社区-腾讯云 (tencent.com)
安装证书
3. Install cert manager
Mainly, we have two ways to install with helm or with kubectl. Personally I prefer to use the helm package manager with all the advantages that comes with it.
Option 1: Install by Helm (recommended)
Add the oficial repository on Helm
1
|
helm repo add jetstack https://charts.jetstack.io
|
Update your local Helm chart repository
And install de cert-manager with namespace cert-manager
1
2
3
4
5
|
helm install \
 cert-manager jetstack/cert-manager \
  --namespace cert-manager \
  --create-namespace \
  --set installCRDs=true
|
NOTE : You can find the all config parameters on the oficial chart page: https://artifacthub.io/packages/helm/cert-manager/cert-manager
Option 2: Install by kubectl
1
|
kubectl apply -f https://github.com/cert-manager/cert-manager/releases/download/v1.12.4/cert-manager.crds.yaml
|
3.1 Verify the cert manager installation
1
|
kubectl -n cert-manager get pod
|

4. Create the ClusterIssuer resource
Create ClusterIssuer for staging environment
 1
 2
 3
 4
 5
 6
 7
 8
 9
10
11
12
13
14
15
16
17
18
19
20
21
|
# cluster-issuer-staging.yaml

apiVersion: cert-manager.io/v1
kind: ClusterIssuer
metadata:
  name: letsencrypt-staging
  namespace: default
spec:
  acme:
    server: https://acme-staging-v02.api.letsencrypt.org/directory
    email: hxf168482@gmail.com # replace for your valid email
    privateKeySecretRef:
      name: letsencrypt-staging
    solvers:
    - selector: {}
      http01:
        ingress:
          class: traefik

kubectl apply -f cluster-issuer-staging.yaml
|
Create ClusterIssuer for production environment
 1
 2
 3
 4
 5
 6
 7
 8
 9
10
11
12
13
14
15
16
|
apiVersion: cert-manager.io/v1
kind: ClusterIssuer
metadata:
  name: letsencrypt-production
  namespace: default
spec:
  acme:
    server: https://acme-v02.api.letsencrypt.org/directory
    email: <YOUR_EMAIL> # replace for your valid email
    privateKeySecretRef:
      name: letsencrypt-production
    solvers:
    - selector: {}
      http01:
        ingress:
          class: traefik
|
1
|
kubectl get ClusterIssuer -A
|
And check the status of ClusterIssuer
5. Let’s play!
Finally we are going to create our certificate
5.1 Create a dummy application
In this step just create a very basic dummy nginx application, if you already have an application you can go to the next step.
Create a deployment using a default image from nginx:alpine
1
|
kubectl create deployment nginx --image nginx:alpine
|
查看 nginx 创建
1
|
kubectl get deployments
|
expose 服务
1
|
kubectl expose deployment nginx --port 80 --target-port 80
|
5.2 Create a ingress traefik controller
Define the trafik ingress with the cert-manager annotations and the tsl section to be able to manage our certificate.
 1
 2
 3
 4
 5
 6
 7
 8
 9
10
11
12
13
14
15
16
17
18
19
20
21
22
23
24
25
26
27
28
29
30
|
# ingress ingress-nginx.yaml

apiVersion: networking.k8s.io/v1
kind: Ingress
metadata:
  annotations:
    cert-manager.io/cluster-issuer: letsencrypt-production
    kubernetes.io/ingress.class: traefik
  labels:
    app: nginx
  name: nginx
  namespace: default
spec:
  rules:
  - host: example.com # Change by your domain
    http:
      paths:
      - backend:
          service:
            name: nginx
            port:
              number: 80
        path: /
        pathType: Prefix
  tls:
  - hosts:
    - example.com # Change by your domain
    secretName: example-com-tls

kubectl apply -f ingress-nginx.yaml
|
apiVersion: cert-manager.io/v1
kind: Certificate
metadata:
name: letsencryptk3s-albertcolom-com-tls
spec:
secretName: letsencryptk3s-albertcolom-com-tls
duration: 2160h # 90d
renewBefore: 360h # 15d
isCA: false
dnsNames:
- “albertcolom.com”
- “*.albertcolom.com”
issuerRef:
name: letsencrypt-staging
kind: ClusterIssuer
group: cert-manager.io
helm upgrade -i my-kong kong/kong -n kong
–set image.tag=3.6
∙ –set admin.enabled=true
∙ –set admin.http.enabled=true
∙ –set ingressController.installCRDs=false
∙ –create-namespace
WARNING: Kubernetes configuration file is group-readable. This is insecure. Location: /home/xfhuang/.kube/config
WARNING: Kubernetes configuration file is world-readable. This is insecure. Location: /home/xfhuang/.kube/config
Release “my-kong” does not exist. Installing it now.
1
2
3
4
5
6
7
8
9
|
 kubectl apply -f - << EOF
∙ apiVersion: cert-manager.io/v1
∙ kind: ClusterIssuer
∙ metadata:
∙  name: selfsigned-cluster-issuer
∙ spec:
∙  selfSigned: {}
∙ EOF
clusterissuer.cert-manager.io/selfsigned-cluster-issuer created
|
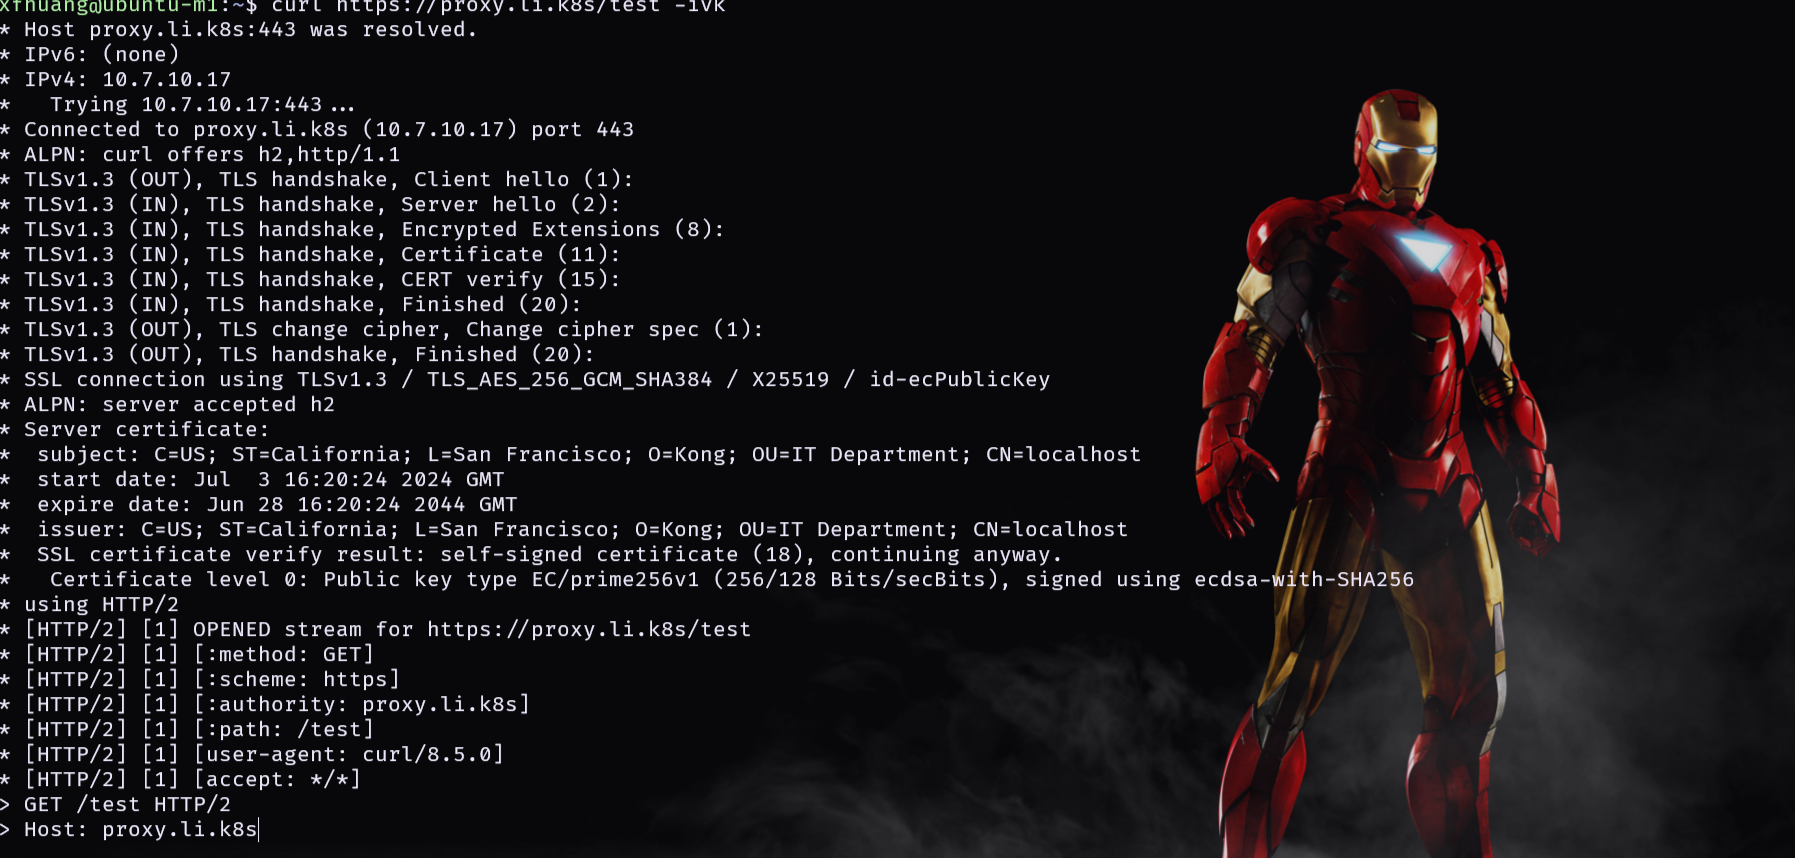
curl https://proxy.li.k8s/test -ivk
注意添加 demo-1
1
|
kubectl annotate ingress echo-route cert-manager.io/cluster-issuer=selfsigned-cluster-issuer
|

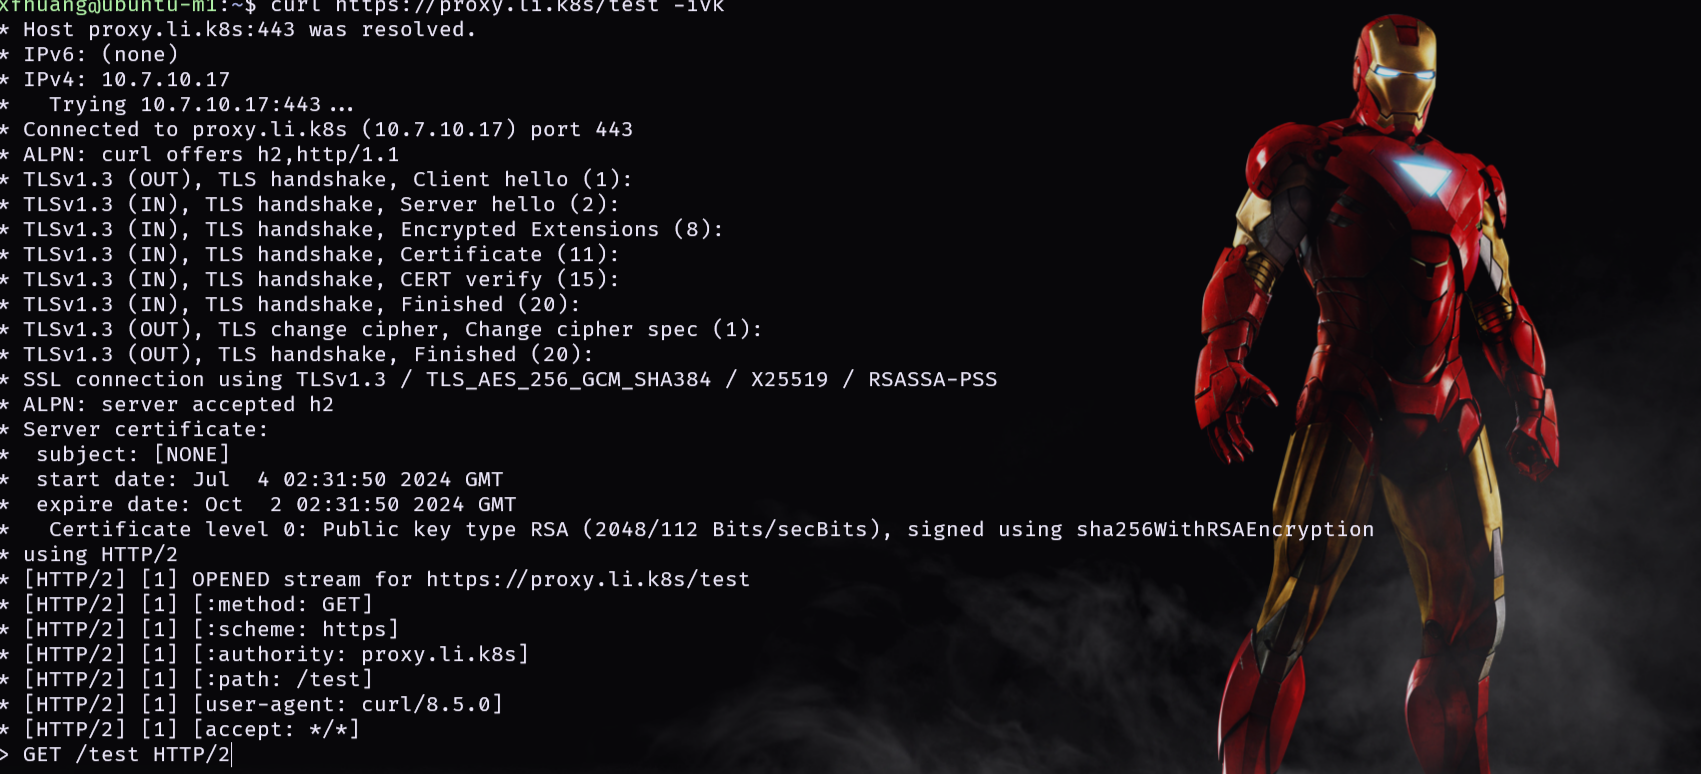
添加 demo-1 之后
证书变了
 ![[image-20240704104601112.png]]
用 certificate object 来装件证书 demo-2
 1
 2
 3
 4
 5
 6
 7
 8
 9
10
11
12
13
14
15
16
17
18
19
20
21
22
23
24
25
26
27
28
29
30
31
32
33
34
35
36
37
38
39
40
41
42
43
44
45
46
47
48
49
50
51
52
53
54
55
56
57
58
59
60
61
62
63
64
65
66
67
68
69
70
71
72
73
74
75
76
|
kubectl apply -f - << EOF
∙ apiVersion: cert-manager.io/v1
kind: Certificate
metadata:
name: ca-demo-cert
spec:
secretName: demo-2
commonName: li.k8s
# You can also use RSA keys, I prefer ECC certs.
privateKey:
# It is better to use new key for new certificate.
rotationPolicy: Always
algorithm: ECDSA
encoding: PKCS8
size: 256
usages:
- server auth
- client auth
# I can add wildcard domain here because I use an issuer using dns01 method.
dnsNames:
- "*.li.k8s"
∙ >....
rotationPolicy: Always
algorithm: ECDSA
encoding: PKCS8
size: 256
usages:
- server auth
- client auth
# I can add wildcard domain here because I use an issuer using dns01 method.
dnsNames:
- "*.li.k8s"
issuerRef:
# Issuer name wiut
name: letsencrypt-dns-staging
# Type of the issuer
kind: ClusterIssuer <....
∙ >....
algorithm: ECDSA
encoding: PKCS8
size: 256
usages:
- server auth
- client auth
# I can add wildcard domain here because I use an issuer using dns01 method.
dnsNames:
- "*.li.k8s"
issuerRef:
# Issuer name wiut
name: fomm-k8s-ca-issuer
# Type of the issuer
kind: ClusterIssuer
∙ EOF
certificate.cert-manager.io/ca-demo-cert created
…/workspace/tools/k3s
|
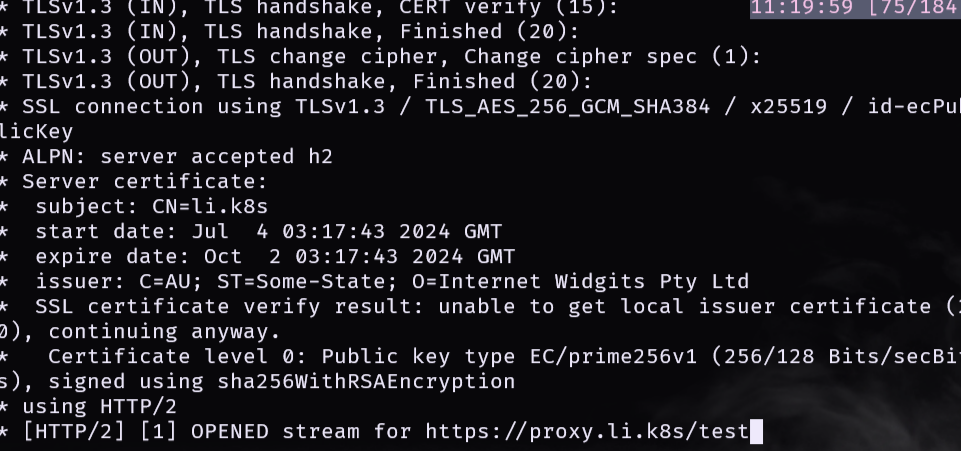
创建完成后,可以看到 demo-2 创建成功,直接访问一下就可以了
再访问一下地址可以看到如下信息 subject
 ![[image-20240704112518103.png]]
参考文档:
https://tech.aufomm.com/how-to-use-cert-manager-on-kubernetes/#Certificate-Object
安装 rancher
1
2
3
4
5
6
7
|
kubectl create namespace cattle-system

helm install rancher rancher-alpha/rancher \
  --namespace cattle-system \
  --set hostname=rancher.k8s.li \
  --set bootstrapPassword=changeme
|
 ![[image-20240702160800749.png]]

 ![[image-20240704104601112.png]]
 ![[image-20240704112518103.png]]