本文采用 helm 来部署 hugo-blog 了,然后采用 Drone Pipeline 来进行自动化部署或者更新到 kubernets。
helm 创建一下
1
2
|
 helm create drone-k8s-demo
 mv drone-k8s-demo .helm
|
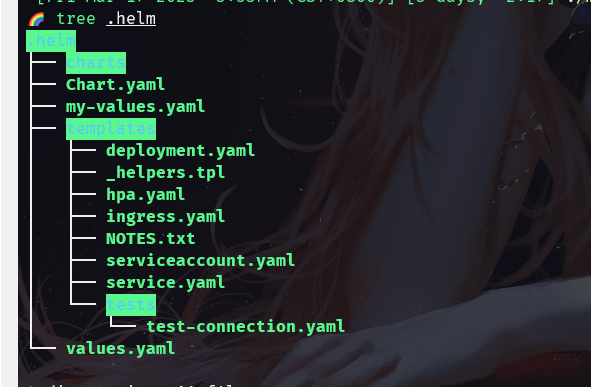
执行一下 tree 看看结构如下:

-
Helm 是一个 Kubernetes 应用程序包管理器,可以用于部署和管理 Kubernetes 应用程序。Helm 使用称为 Charts 的打包格式,其中包含 Kubernetes 部署所需的所有资源。
在 Helm 中,每个 Chart 都是一个目录,其中包含一组定义 Kubernetes 资源的 YAML 文件和一个名为 Chart.yaml 的文件,该文件包含有关 Chart 的元数据。此外,Chart 目录还可以包含一个名为 values.yaml 的文件,该文件包含要应用于 Chart 的默认值。用户可以在安装 Chart 时指定自定义值。
以下是一些常见的 Helm 文件及其介绍:
Chart.yaml: 包含 Chart 的元数据,如名称、版本、描述、维护者信息等。values.yaml: 包含 Chart 的默认值。可以使用 --values 标志在安装 Chart 时指定自定义值。templates/: 包含 Kubernetes 资源的模板文件,这些文件将在安装 Chart 时使用。模板文件中可以使用 Helm 的模板语言,例如使用 {{ .Values.xxx }} 引用 values.yaml 中定义的值。helpers.tpl: 包含一些可重用的模板片段,这些片段可以在 templates/ 中的模板文件中使用。files/: 包含要在 Kubernetes 资源中使用的其他文件,如配置文件、证书等。charts/: 包含其他 Charts 的引用,这些 Charts 会在安装当前 Chart 时一起安装。可以在 requirements.yaml 中定义这些依赖关系。README.md: 提供有关 Chart 的文档,例如如何安装、如何配置等信息。
这些文件组合在一起定义了一个 Helm Chart,使得可以方便地打包、部署和管理 Kubernetes 应用程序。
修改 values.yml 如下:
 1
 2
 3
 4
 5
 6
 7
 8
 9
10
11
12
13
14
15
16
17
18
19
20
21
22
23
24
25
26
27
28
29
30
31
32
33
34
35
36
37
38
39
40
41
42
43
44
45
46
47
48
49
50
51
52
53
54
55
56
57
58
59
60
61
62
63
64
65
66
67
68
69
70
71
72
73
74
75
76
77
78
79
80
81
82
|
# Default values for drone-k8s-demo.
# This is a YAML-formatted file.
# Declare variables to be passed into your templates.

replicaCount: 1

image:
  repository: 10.7.20.12:5000/my_blog #修改这个
  pullPolicy: Always # 修改下载方式
  # Overrides the image tag whose default is the chart appVersion.
  tag: latest #修改tag

imagePullSecrets: []
nameOverride: ""
fullnameOverride: ""

serviceAccount:
  # Specifies whether a service account should be created
  create: true
  # Annotations to add to the service account
  annotations: {}
  # The name of the service account to use.
  # If not set and create is true, a name is generated using the fullname template
  name: ""

podAnnotations: {}

podSecurityContext: {}
  # fsGroup: 2000

securityContext: {}
  # capabilities:
  #   drop:
  #   - ALL
  # readOnlyRootFilesystem: true
  # runAsNonRoot: true
  # runAsUser: 1000

service:
  type: ClusterIP
  port: 80

ingress:
  enabled: false
  className: ""
  annotations: {}
    # kubernetes.io/ingress.class: nginx
    # kubernetes.io/tls-acme: "true"
  hosts:
    - host: chart-example.local
      paths:
        - path: /
          pathType: ImplementationSpecific
  tls: []
  #  - secretName: chart-example-tls
  #    hosts:
  #      - chart-example.local

resources: {}
  # We usually recommend not to specify default resources and to leave this as a conscious
  # choice for the user. This also increases chances charts run on environments with little
  # resources, such as Minikube. If you do want to specify resources, uncomment the following
  # lines, adjust them as necessary, and remove the curly braces after 'resources:'.
  # limits:
  #   cpu: 100m
  #   memory: 128Mi
  # requests:
  #   cpu: 100m
  #   memory: 128Mi

autoscaling:
  enabled: false
  minReplicas: 1
  maxReplicas: 100
  targetCPUUtilizationPercentage: 80
  # targetMemoryUtilizationPercentage: 80

nodeSelector: {}

tolerations: []

affinity: {}
|
如何调试 helm 文件了,可以通过 helm install --dry-run --debug 命令来渲染资源清单文件,但不是整整的部署到集群。
1
2
3
4
5
6
|
helm install --dry-run --debug -name staging --namespace kube-ops .helm/
install.go:194: [debug] Original chart version: ""
install.go:211: [debug] CHART PATH: /mnt/e/myhugo/.helm

Error: INSTALLATION FAILED: Kubernetes cluster unreachable: Get "https://127.0.0.1:32774/version": dial tcp 127.0.0.1:32774: connect: connection refused
helm.go:84: [debug] Get "https://127.0.0.1:32774/version": dial tcp 127.0.0.1:32774: connect: connection refused
|
在.helm 目录下创建一个 my-values》yaml 的文件,用来覆盖默认的 values 文件:
 1
 2
 3
 4
 5
 6
 7
 8
 9
10
11
12
|
image:
  repository: 10.7.20.12:5000/my_blog
  tag: latest
  pullPolicy: Always

resources:
  limits:
    cpu: 50m
    memory: 128Mi
  requests:
    cpu: 50m
    memory: 128Mi
|
当然同样的,我们可以通过上面的命令来调试渲染模板:
1
|
$ helm install --dry-run --debug -name staging --namespace kube-ops -f helm/my-values.yaml helm/
|
Pipeline
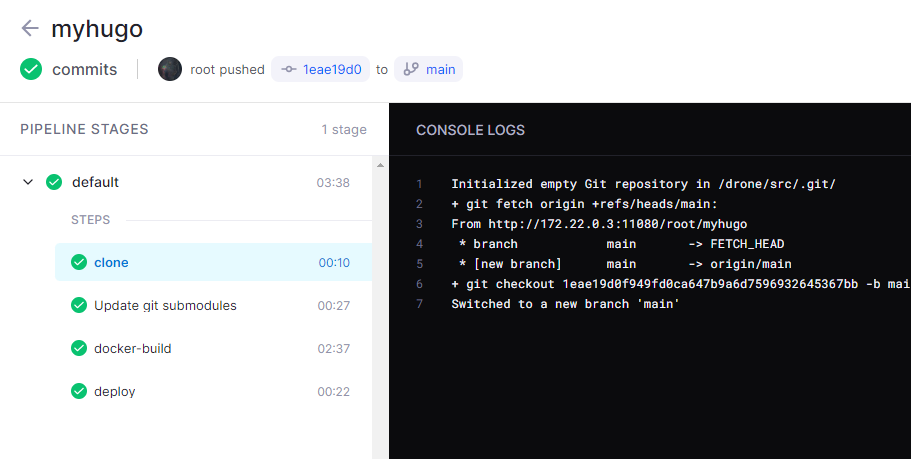
在 drone 通过 helm 插件可以进行 helm 的安装,
 1
 2
 3
 4
 5
 6
 7
 8
 9
10
11
12
13
14
15
16
17
18
|
- name: deploy
    image: "pelotech/drone-helm3"
    pull: if-not-exists
    settings:
      client-only: true
      wait: true
      recreate_pods: true
      mode: upgrade
      chart: ./.helm/
      vaules_yaml: ./.helm/my-values.yaml
      release: test1
      namespace: droneci
      kube_api_server: "https://10.*.*.26:6443" # 替换成你的ip
      kube_token:
        from_secret: kube_token
      skip_tls_verify: true
      values:
        - image.tag=${DRONE_COMMIT:0:8}
|
部署完后的操作为

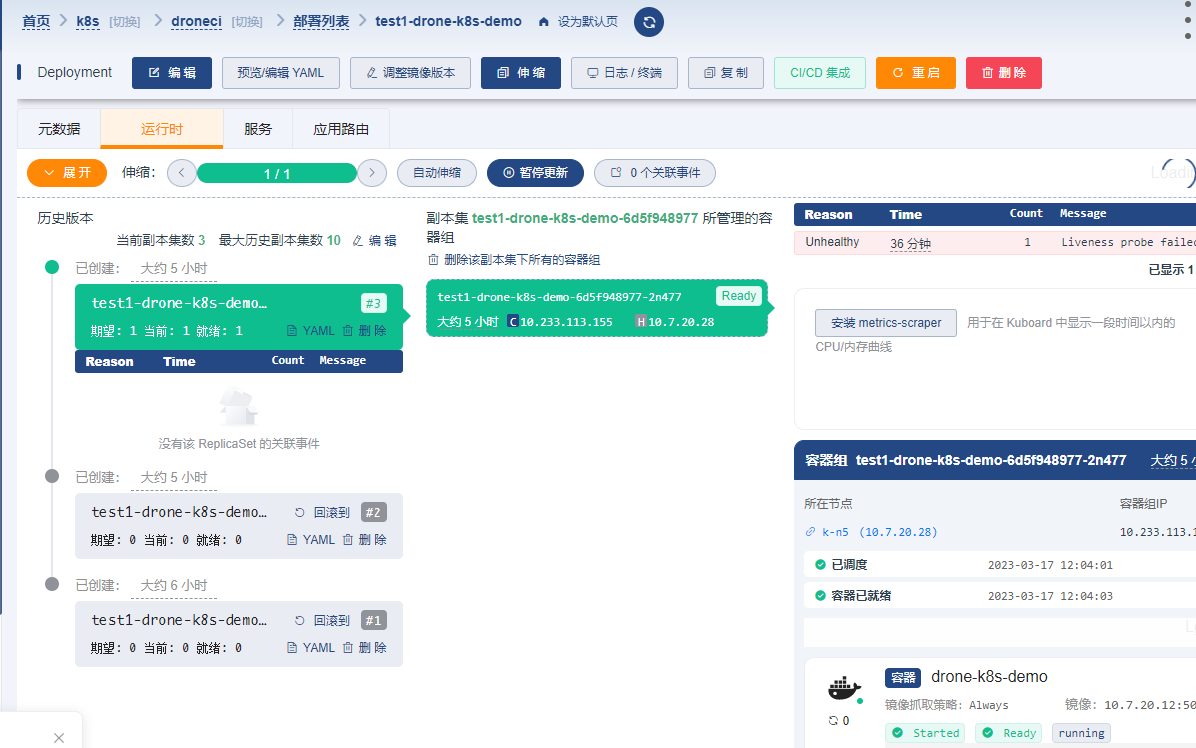
不到到 k8s 上的界面如下图所示

体外话:
如何让 windows 能访问到 wsl2 中 docker 的 ip,需要借助 route add。在 windows 下打开管理员模式下的 windowsterminal,执行以下命令即可访问
1
|
ROUTE add 172.22.0.0 mask 255.255.0.0 192.168.120.181
|

解释一下参数:
172.22.0.0 为需要路由到内部 wsl 的 ip,
192.168.120.181 是设置给 wsl2 的 ip。
转载一些:
 1
 2
 3
 4
 5
 6
 7
 8
 9
10
11
12
13
14
15
16
17
18
19
20
21
22
23
24
25
26
27
28
29
30
31
32
33
34
|
WSL2中自动配置Windows IP地址
在内测版的WSL2中,WSL本身运行在虚拟机中,因此不能使用本地回环(localhost, 127.0.0.1),导致无法直接使用代理服务器,又由于每次网络变化生成的ip地址都不同,因此整个配置过程极为复杂。

经过测试,可以采用一下办法,通过/etc/hosts来将一个特定的域名重定向到主机

具体shell文件如下:

#!/bin/sh
export HOSTIP=$(cat /etc/resolv.conf | grep 'nameserver' | cut -f 2 -d ' ')
export CLIENTIP=$(ip addr show eth0 | grep 'inet ' | cut -f 6 -d ' ' | cut -f 1 -d '/')
echo $HOSTIP
echo $CLIENTIP
echo <Your password> | sudo -S sed -i "/host/c $HOSTIP\thost" /etc/hosts
2020 年 5 月 8 日更新:增加了对 proxychains 的设置,以及同步修改 Windows hosts 文件,以及 Ex mode 从管道读入修改失败,换成了另一种方式
2020 年 6 月 15 日更新:需要 Windows 设置可写入,右键 host 文件,属性-安全-高级,把 Windows 登录用户给予“完全控制”权限即可

#!/bin/sh
export WINIP=$(cat /etc/resolv.conf | grep 'nameserver' | cut -f 2 -d ' ')
export WSLIP=$(ip addr show eth0 | grep 'inet ' | cut -f 6 -d ' ' | cut -f 1 -d '/')
echo WINIP $WINIP
echo WSLIP $WSLIP

echo <Your password> | sudo -S sed -i "/winip/c $WINIP\twinip" /etc/hosts
echo <Your password> | sudo -S sed -i "/socks5/c socks5\t$WINIP 1080" /etc/proxychains.conf

vim "+:%s/^.*winip/$WINIP\t\twinip/g" "+:%s/^.*wslip/$WSLIP\t\twslip/g" '+:wq' -E /mnt/c/Windows/System32/drivers/etc/hosts

将其放置在环境变量里,并设置可执行权限(如果文件名是net则执行chmod a+x net)。每次网络变化后执行net即可
在VSCode等需要配置代理的地方,直接使用http://winip:1081即可正常使用代理

如果需要在 Windows 中通过127.0.0.1或localhost访问 WSL2 服务,则可以在用户目录下建立.wslconfig,并写入

[wsl2]
localhostForwarding=true
|


